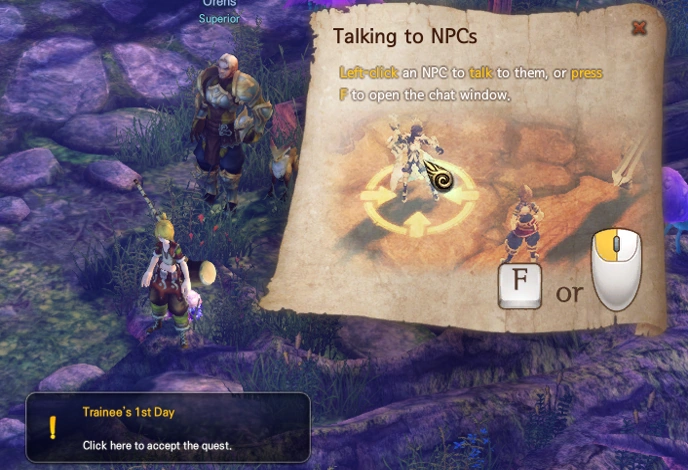
Game Screen[ | ]
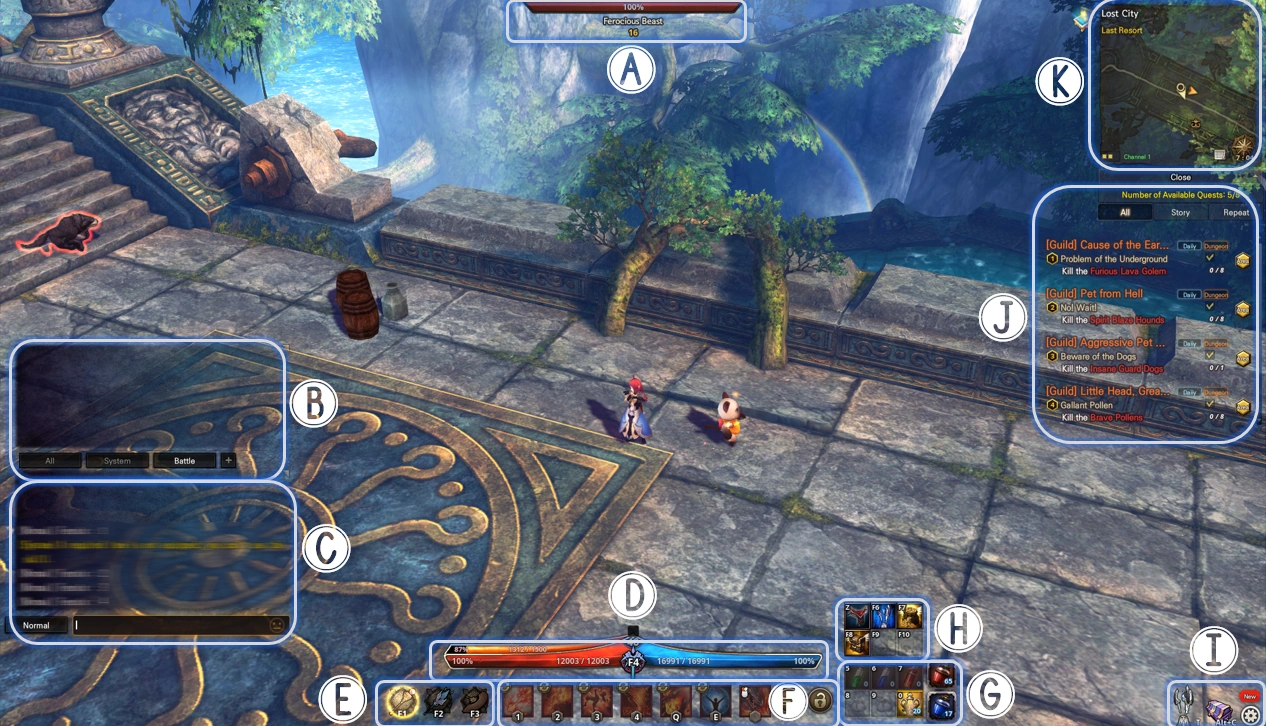
- Target Information - Provides information about the target being attacked.
- Server Chat - You can use the shout item to chat within the server.
- Chat window - There are [All], [System] and [Battle] tabs that show various kinds of messages.
- Character Information - You can check your character's HP, MP, Level and class information(stats).
- Combat Type - Displays the three combat types and the current combat type.
- Skill Slot - You can locate the skill you want to use to check availability and cooldown time.
- Item Slot - You can use these slots conveniently by locating a major expendable item.
- Pet Skill - You can see the skill information of the pet you are equipping.
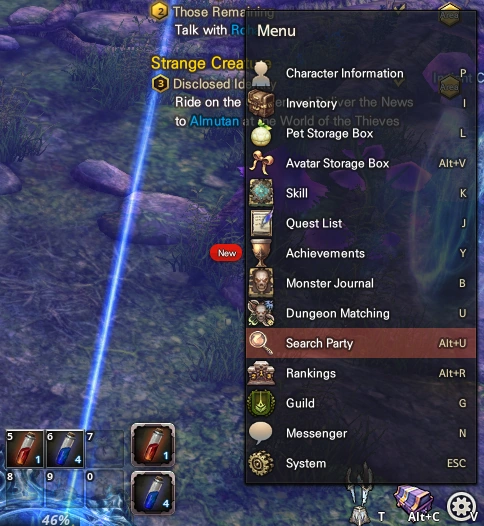
- System Menu - You can print out each menu by clicking [Return], [Item Shop], [Menu].
- Quick Quest List - Brings up your Quest Log/List to show you your current active Quest.
- Minimap - You can find information about [NPC], [Monster], and [Quest] around the character.
Character Information[ | ]

- You can check your character's HP, MP, and wearing equipment level.
- You can see the points of offensive, defensive, and extra abilities.
- You can check the equipped items.
- Output level, transcendence level, character name, title and class.
- Character information and Battle Records.
- Click to display Tittle information.
- Click to display Progress information.
Character's Battle records[ | ]

- Character's Battle record.
- Arena information.
Character Title Information[ | ]
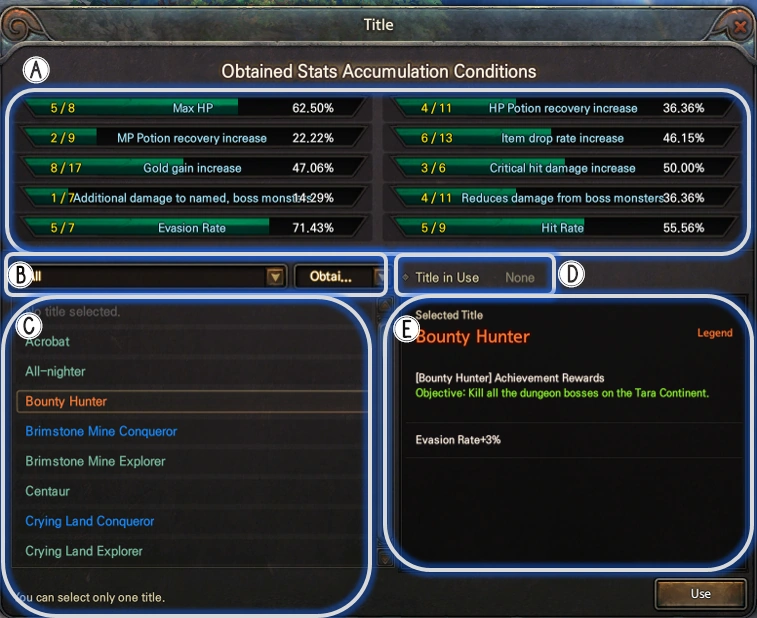
- Check accumulative acquisition status of each effect title.
- All, obtained and non-obtained, classification as a whole is possible.
- Title List.
- Displays the currently used title.
- You can see the acquisition method and benefits for the selected title.
Character Progress Information[ | ]
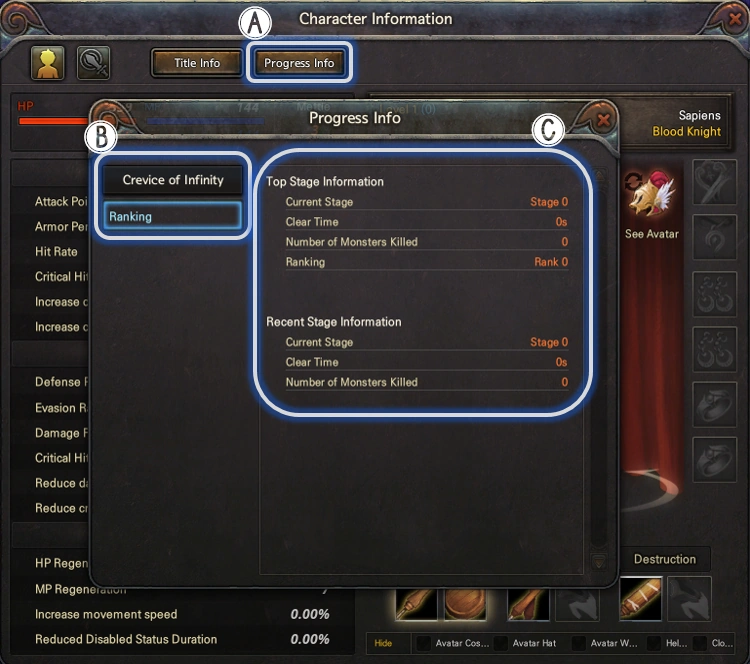
- You can check the progress information of the character through the [Progress Info] tab.
- Selection of information according to the ranking of stages.
- Output of information for the item in B.
Skills and Enhancements[ | ]
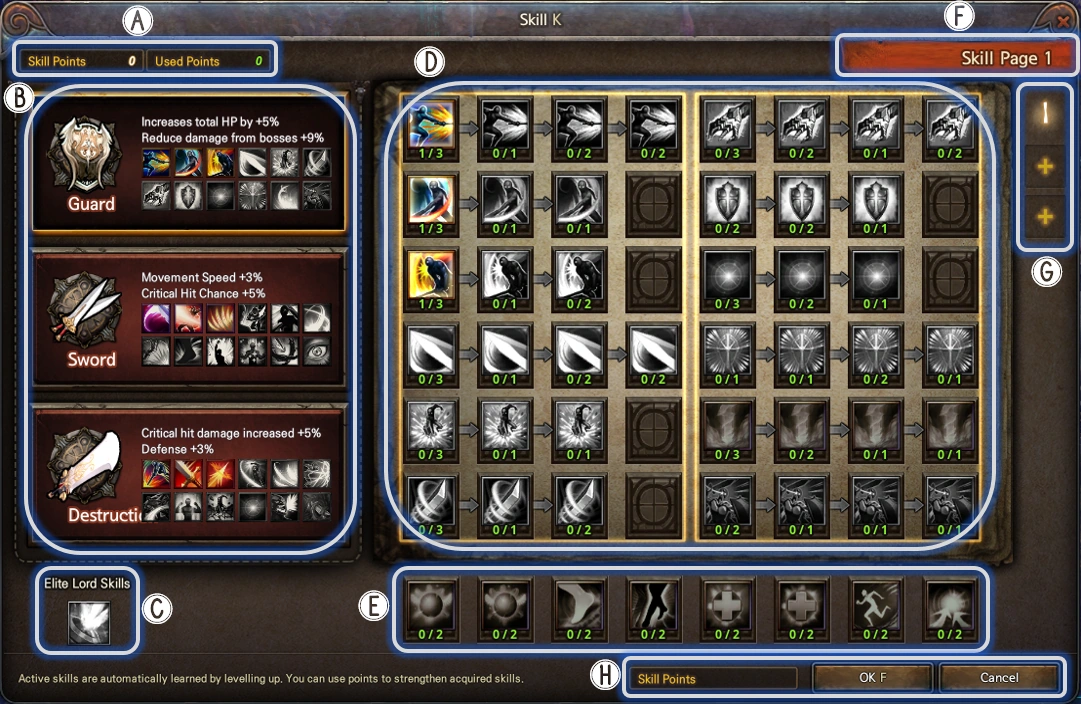
- Displays the acquired skill points and used skill points.
- You can see the skills page according to the combat stances.
- Information about elite lord skills.
- You can see the skill information of the selected stace and skill enhancements in item B and the skill.
- You can find information about the passive skills that apply to all combat stances.
- You can see the current skill page.
- You can change each skill page set by clicking the number icon.
- After applying skill points to the skill you want to upgrade, press the OK button to confirm the skill enhancement.
When you increase your skill, you will spend the amount of gold in your skill cost.
- The number on the left of the slash at the bottom of the skill icon shows the enhancement value of that skill.
- The number on the right side of the slash at the bottom of the skill icon shows the maximum enhancement value using skill points.
- The numbers in blue text indicate that the skill has been enhanced due to the effect of the item, and the rightmost value indicates that the item is reinforced.
- If you do not have enough basic skill pages, you can get up to 3 skill pages by paying gold.
- You can buy a new skill page by clicking the "+" icon.
Warehouse and Inventory[ | ]
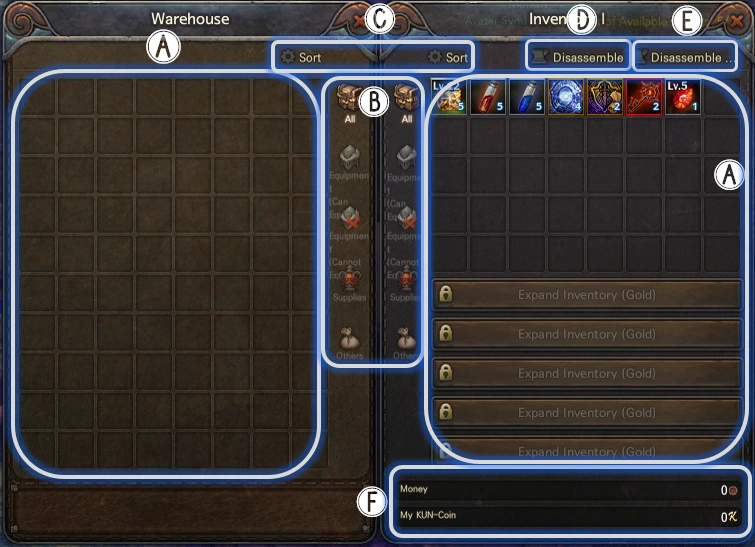
- You can see items currently in your warehouse and inventory.
- Displays items of warehouse and bag easily by sorting according to all, equipment, consumables, materials and other type of items.
- Arrange the items sequentially according to their type.
- Disassemble not needed items to acquire material items.
- By setting specific conditions, unnecessary items can be all disassembled at once.
- Indicates gold and kun-coin that you currently hold
Warehouse Call[ | ]

- The warehouse can be checked in the NPC <Warehouse Keeper>
- Warehouse managers are located in each village, they are represented by a "treasure chest" icon in the map.
Quest information[ | ]
- Military Tara's quests are based on general quests (+ main quests) that can connect stories according to character levels.
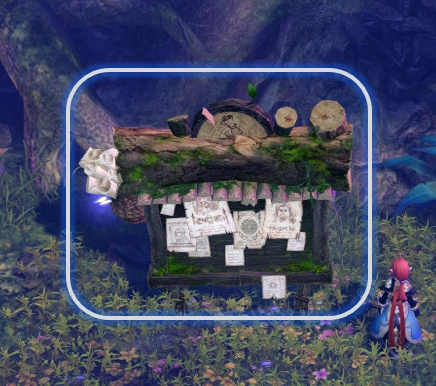
- There are certain quests and recurring quests to be found on the bulletin board or special items.
- Bulletin board is located in various areas.
- You can find more information about the accepted quests in the quest list (shortcut "J") as shown below.
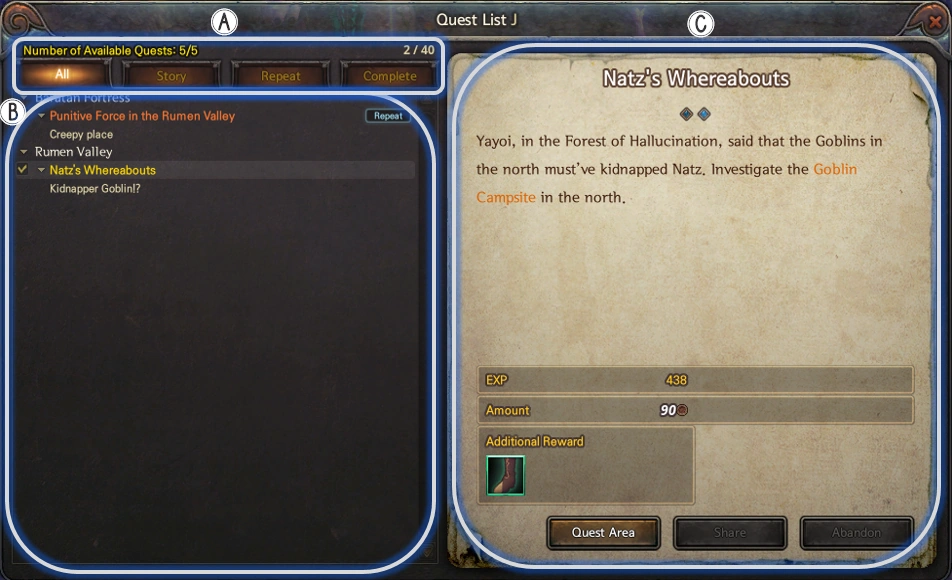
- Each type of quest is grouped.
- You can see the progress information of the accepted quests.
- You can see the story and information of the accepted quests and check the list of rewards.
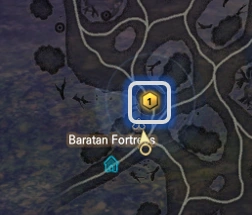
- It is also possible to check the area of the quest through the map, and go to the area where the quest is performed by clicking on the minimap.
- You can move automatically when you click on the area where the quest is performed in the map.
- You can still find the quest even if you zoom out of the continent map.

Map Information[ | ]
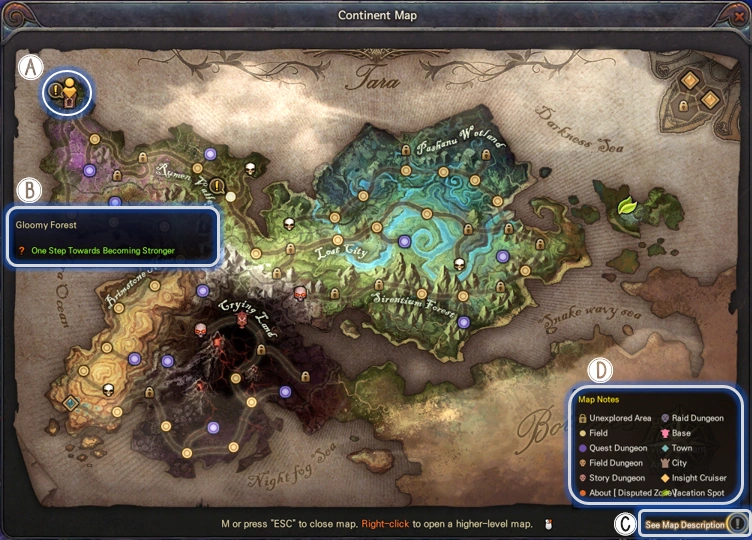
- Indicates the current location.
- When moving the mouse to a point in each region, check the name of the region and information about the quest being performed.
- Click See Map Description to see information.
- After clicking C, you can see information about the icons that appear on the map.
Commerce Information[ | ]
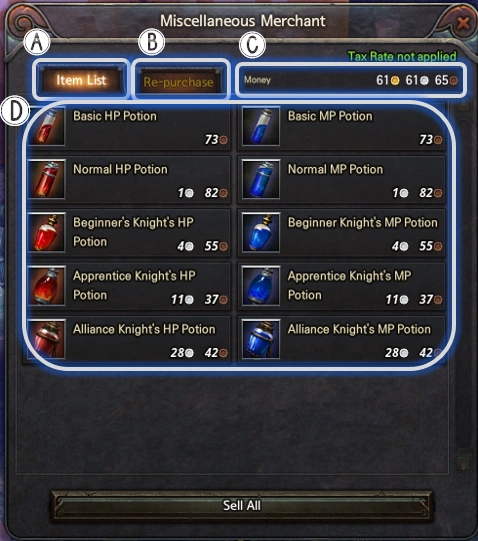
- It shows a list of items available for purchase.
- Shows a list of purchased items.
*They are sorted in the order they were last bought and are deleted after close, logout or character change. - Shows the gold you currently have.
- This is where the list for A and B are displayed.
Merchants Information[ | ]
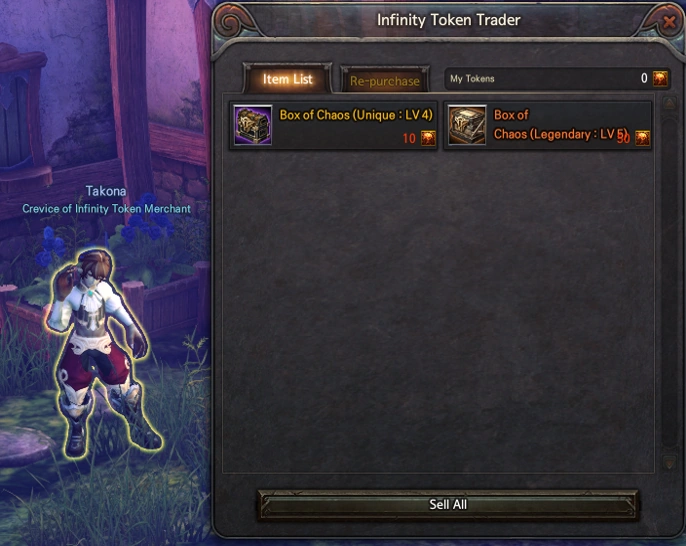
- "Takona" <Crevice of Infinity Token Merchant> is an NPC who sells a Box of Chaos. (It is located in front of the guild station).
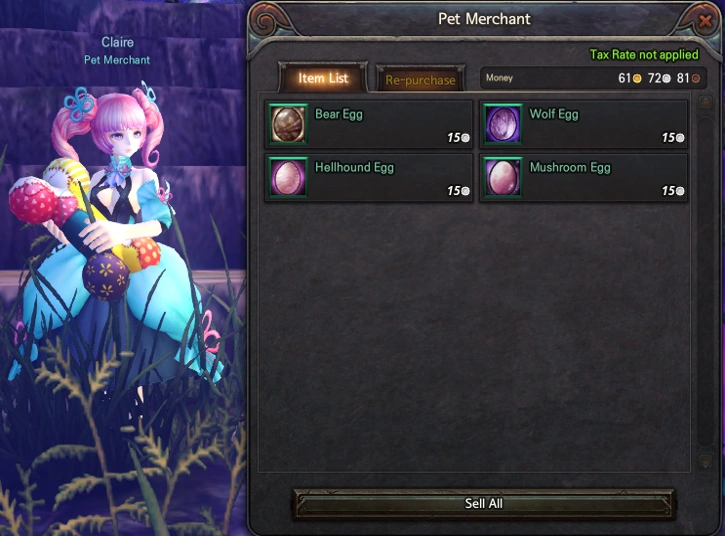
- "Claire" <Pet Merchant> is an NPC who sells Pets.
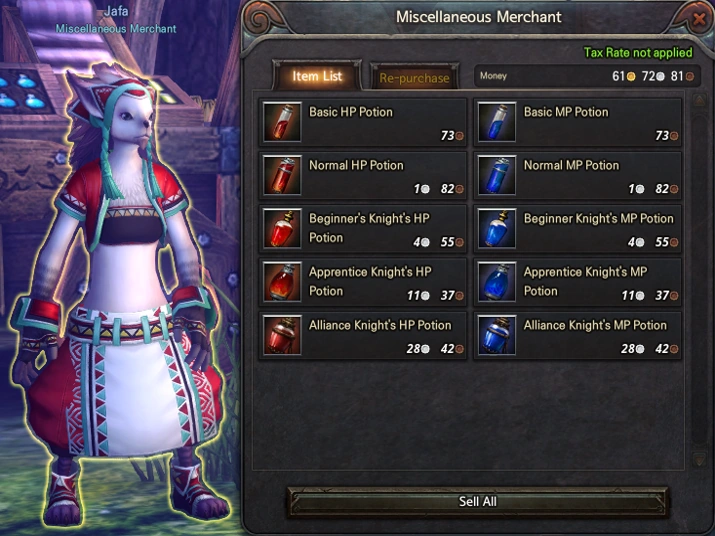
- "Jafa" <Miscellaneous Merchant> is an NPC who sells potion items.
Trading Information[ | ]
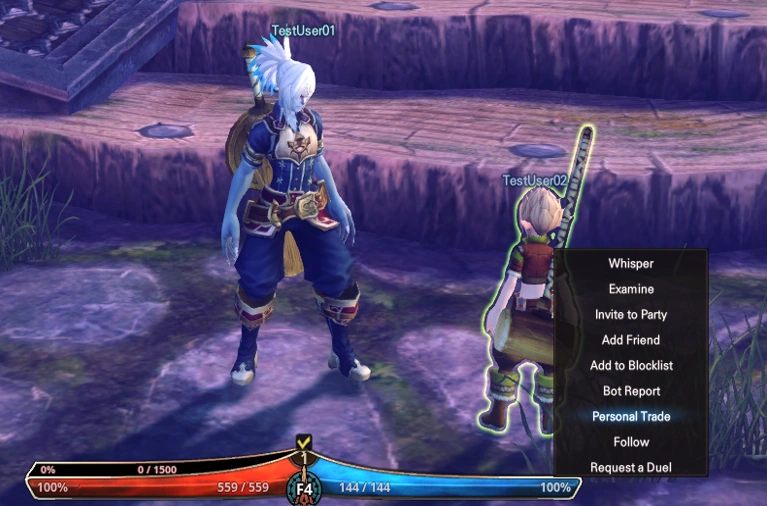
- To start a trade press Ctrl + mouse left click on the character you want to make a trade with and, select the "Personal Trade" option.
Trading Interface[ | ]
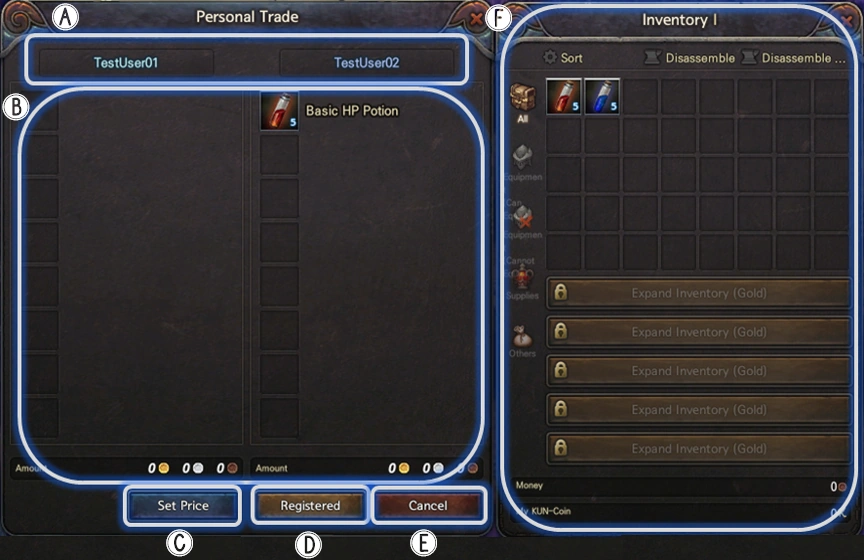
- Confirm the name of your character and the name of the one you're making a trade.
- You can check yours and your counterpart items and gold to be trade.
- You can set the amount of money you want to register for the transaction by registering the amount.
- You can confirm the state of the transaction.
- Cancel trade.
- Check your bag.
Social[ | ]
Messenger[ | ]
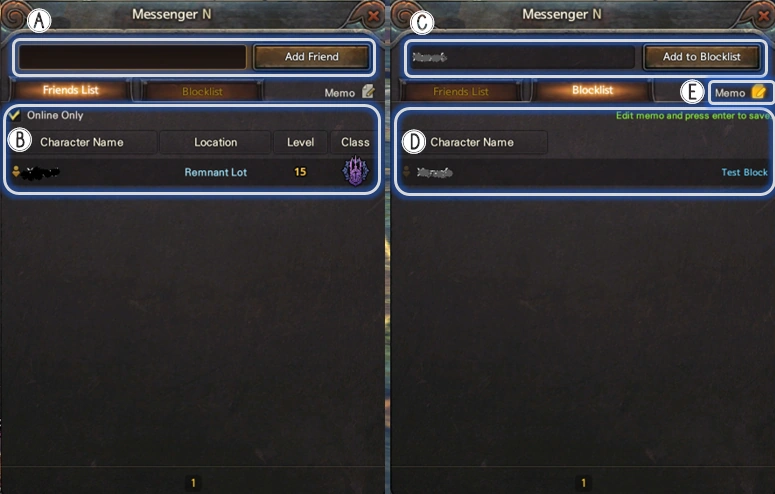
Friend list[ | ]
- You can add friends by clicking the option "Add Friend" at the ctrl + left click menu.
- You can also add a friend using the messenger interface. Just write the name of the player you want to befriend in the input box and click the "Add Friend" button
- You can check the added player status, name, level and class.
Block List[ | ]
- You can block players by clicking the option "Add to Blocklist" at the ctrl + left click menu.
- Blocked users' character name will be displayed in red color and you will not be able to duel, trade, guild or party invite the blocked user.
- You can also block a player using the messenger interface. Just write the name of the player you want to block in the input box and click the "Add to Blocklist" button
- Check the list of blocked characters.
- Enter a brief note about the blocked character.
Mailbox[ | ]
- When mail arrives, a letter icon is created in the upper right corner of the game screen.
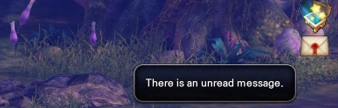
- The received mail can only be read through the mailbox NPC.
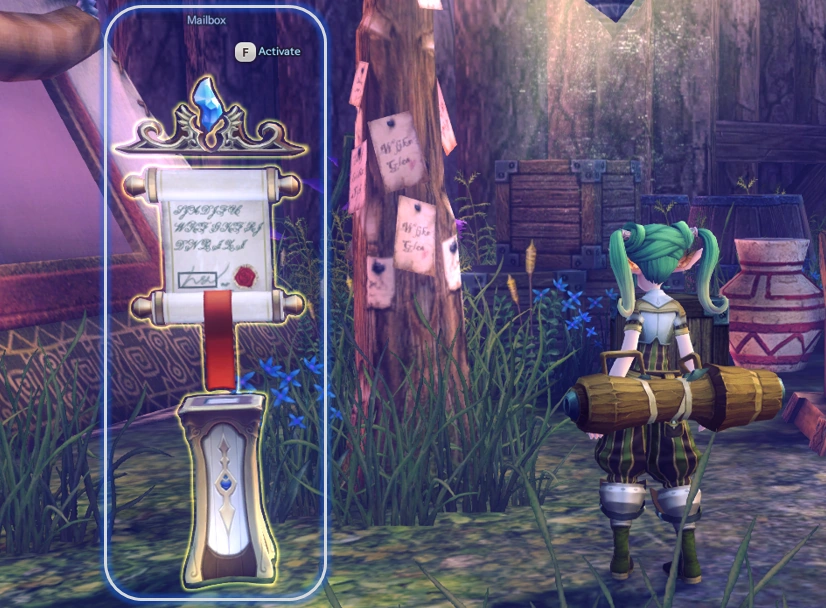
- Mailbox NPC is located in the village, and you can easily check the minimap on the top right or the whole map for a letter icon.
Writing a Letter[ | ]
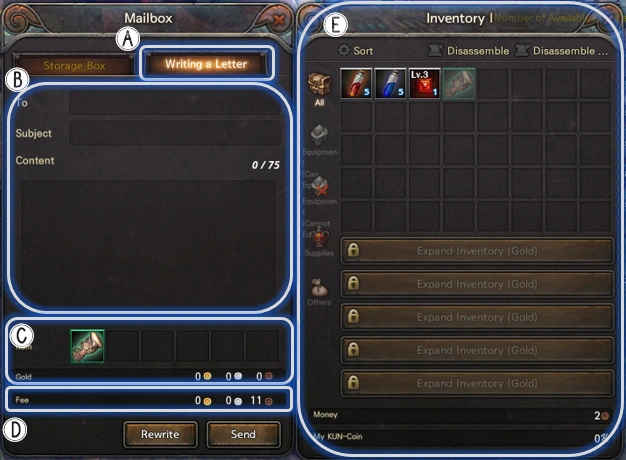
- You can send a mail to your other characters by clicking on Mailboxes in Mailbox.
- You may include the name of the character you wish to send a mail, title and content.
- You can register items to send, including gold (Up to 6 items can be registered).
- Indicate the fee that will be incurred when you mail items or gold are received (The fee will expire).
Check Your Letter[ | ]
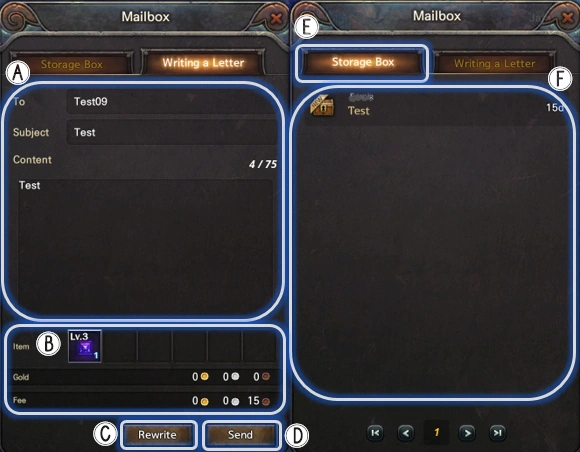
- You can check the name of the sender, mail title and content.
- You can check the items and gold to be delivered with the mail.
- If you click on Receive item, you will get the attached item and gold to your inventory.
- If you click Reply, you can reply to the sender immediately.
- Display your current mail.
- You can see brief information about the postal service and the date of storage.
Party[ | ]
- There are two ways for party play.
Party invitation[ | ]
- You can invite a player to play if you're close to him.
- CTRL + left-click the character you want to invite the party to display the above menus and then select "Invite to Party" option.
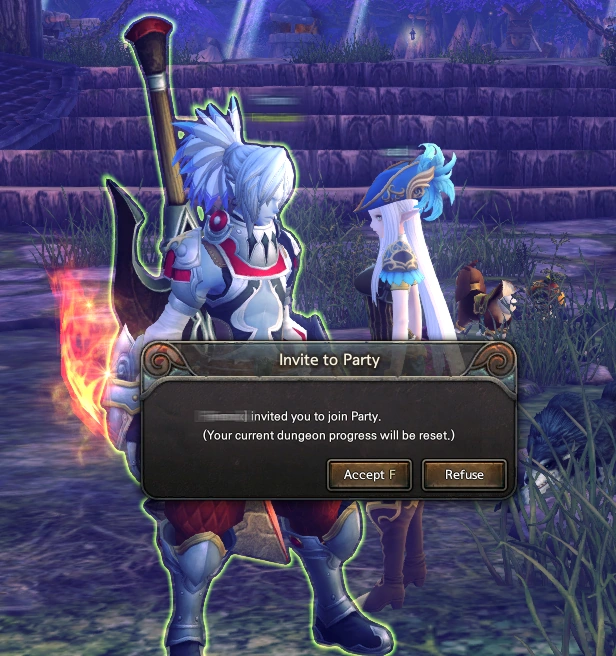
- When the party invitation is received, the following message is displayed on the game screen and you can decide whether or not to join.
Search Party[ | ]
- You can recruit other players for a party using the Search Party interface (ALT + U).
- You can also open the Search Party interface selecting the option Search Party in the Main Menu.
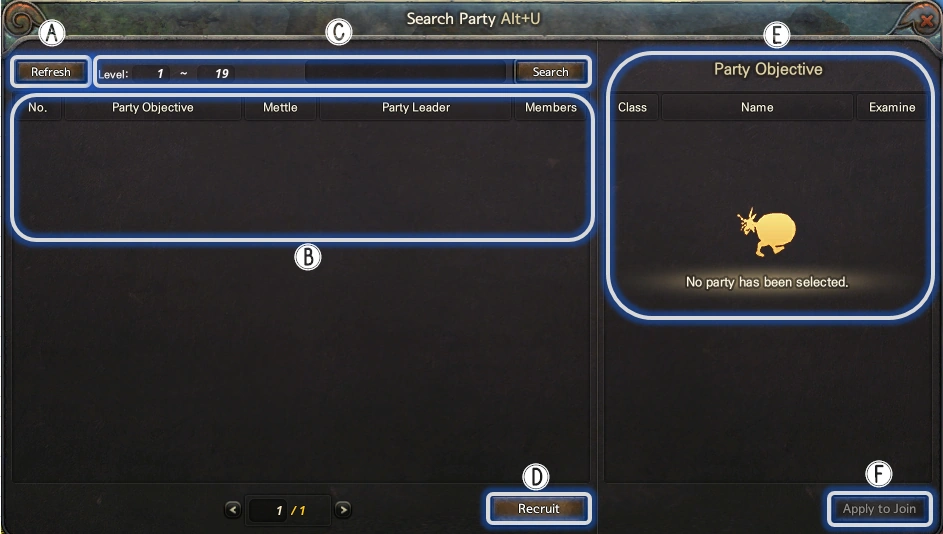
- Refresh the party list.
- Shows the party information.
- You can search for a party of your choice using the level parameters.
- You can create a party for recruitment.
- Confirm the information of the selected party.
- Send the application to the selected party.
Party Recruitment[ | ]
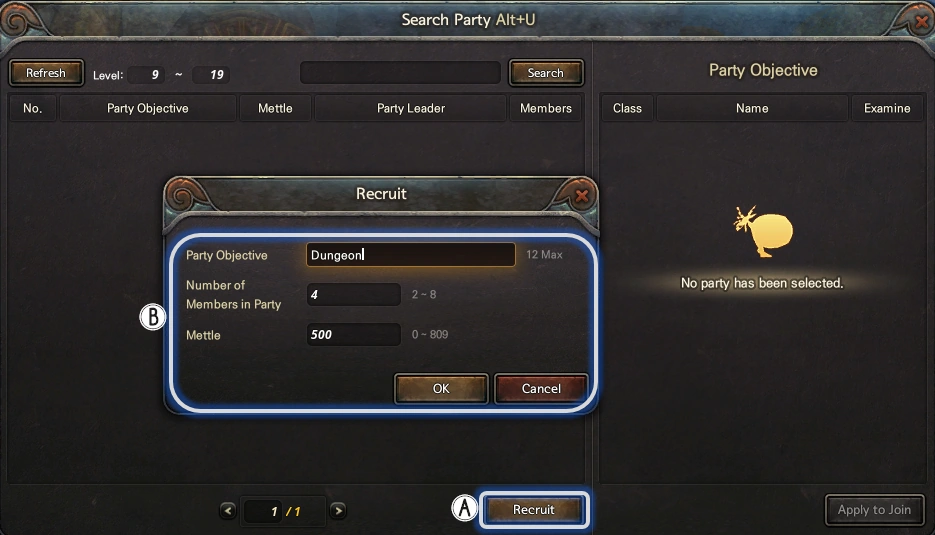
- If you click on the party recruitment, you can organize a party of your choice.
- Specify the purpose of the party to be created, party (up to 12), recommended item level (up to 186) can be configured.
Party Advertise[ | ]
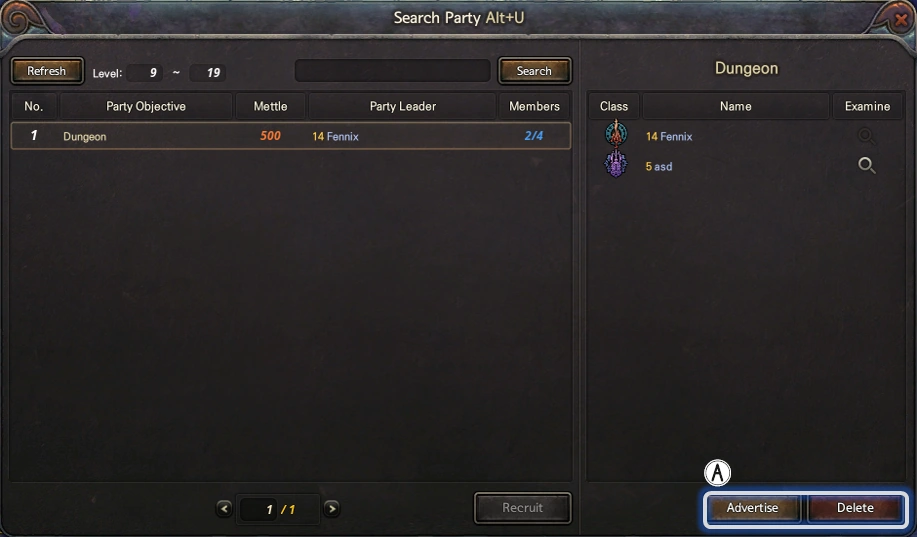
- After creating a party, you can advertise or delete your party recruitment through the party recruitment window.
Party Application[ | ]
- If you click on "Apply to Join", you will see the following message at the bottom right corner.
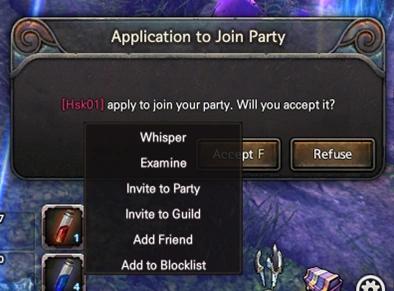
- Accept or decline, you can decide whether or not to join.
- If you click on the character name in the message, you can see that character information.
Party Interface[ | ]
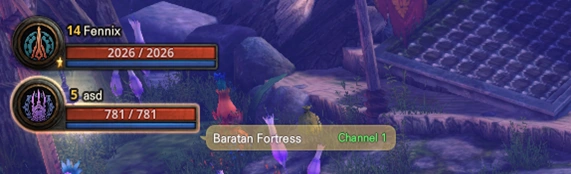
- When the party is created, you can see information about party members.
- When you mouse over character information of a party member, such as location and channel.
Guild[ | ]
Guild creation[ | ]
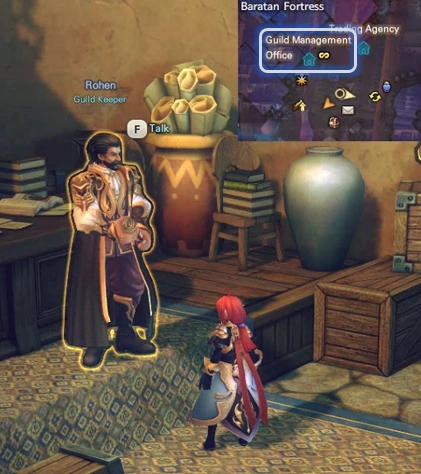
- Guilds can be created through the guild keeper at the Guild Management Office.
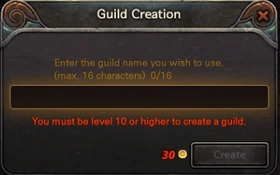
- Guild creation costs 30 Gold.
- Guild name can be up to 16 characters.
- You must be level 10 or higher to create a guild.'
Inviting guilds[ | ]
- To invite a player to a guild just select the "Invite to Guild" option in the CTRL + left-click player menu.
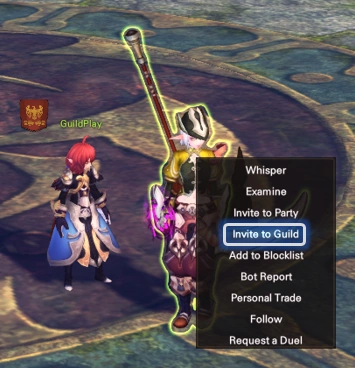
- The invited player will have to accept or decline the invitation in the message located at the bottom right of the screen.
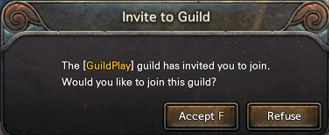
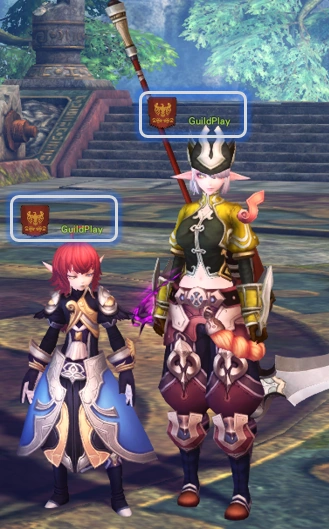
- If you accept the guild invitation you become a member of the guild and the guild name is displayed at the bottom of the character name.
Guild Information and Functions[ | ]
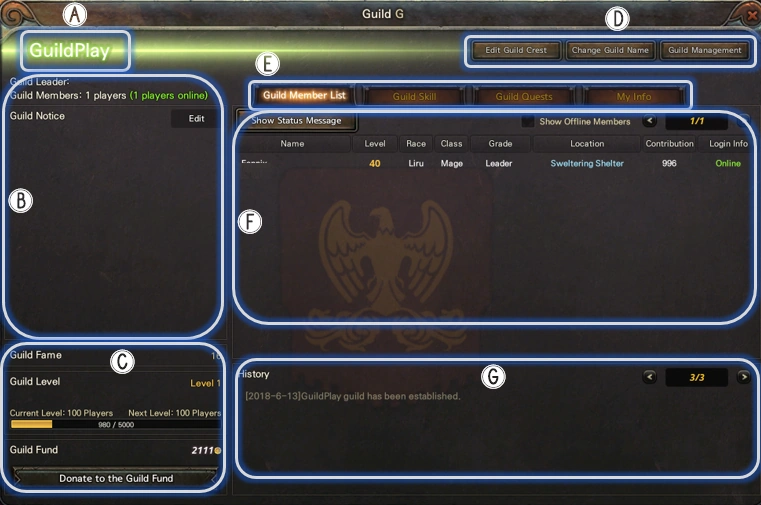
- The name of the guild is displayed.
- Information about Guild: Guild Master, Guild Members and Guild Notice (you can modify the notice).
- Information about Guild Level, number of people that can join and you can donate gold to your guild through "Donate to the Guild Fund."
- Being the Guild Master allows you to edit Guild Quests, Rename guild and manage guild.
- Detailed information on the guild can be checked through each menu.
- Information about logged and offline guild members.
- After the guild has been created, you can check the guild's history.
Donate to the Guild Fund[ | ]

- When you click, a guild funding window such as B will be appear. You can donate as much gold as you want and then click the Donate button.
- Donated gold is used to learn guild skills.
Guild Skills[ | ]
- Guild skills can be purchased only the by the Guild Master.
- You can learn the skill by consuming the gold donated by the guild fund.
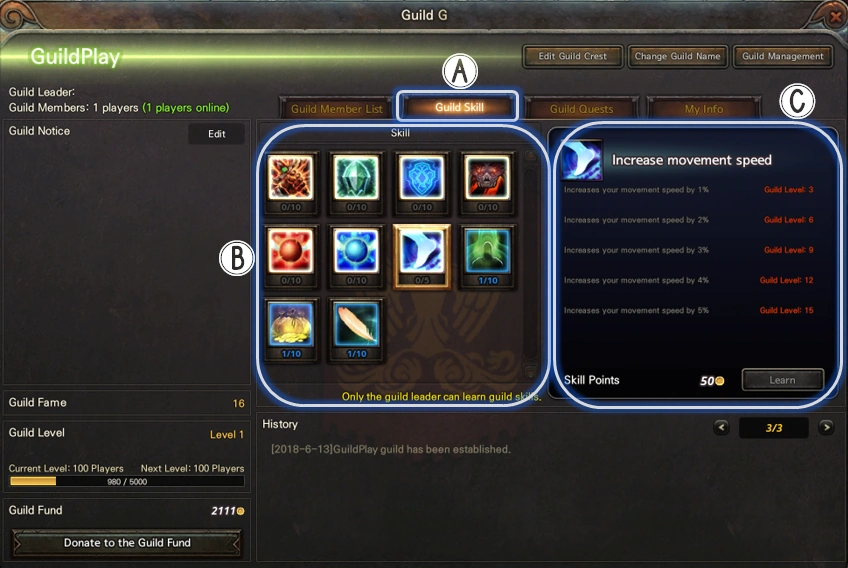
- You can check the guild skill menu by clicking A.
- You can check the skill list of the current guild.
- Information of the selected skill.
Guild Quest[ | ]
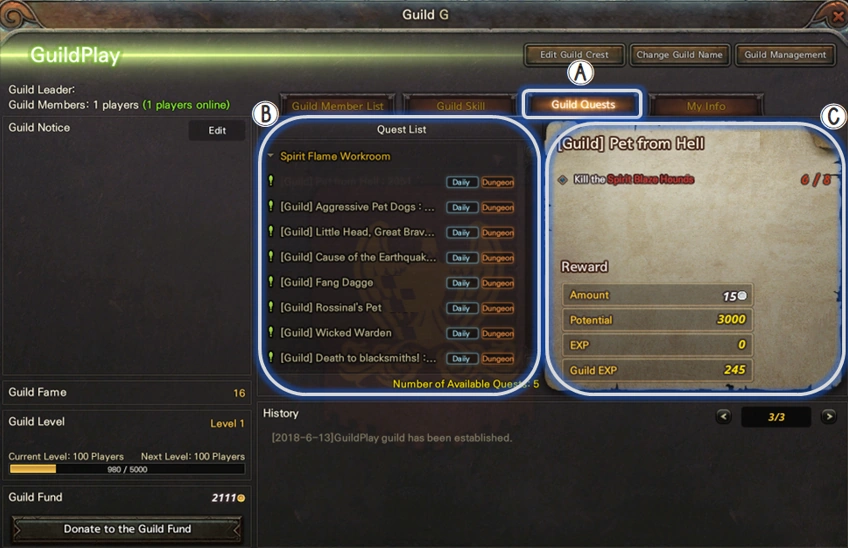
- You can click on the Guild Quest to see the active quests and its progress.
- You can check the guild quest list.
- You can confirm the name, goal, and reward of the selected guild quest.
My Info[ | ]
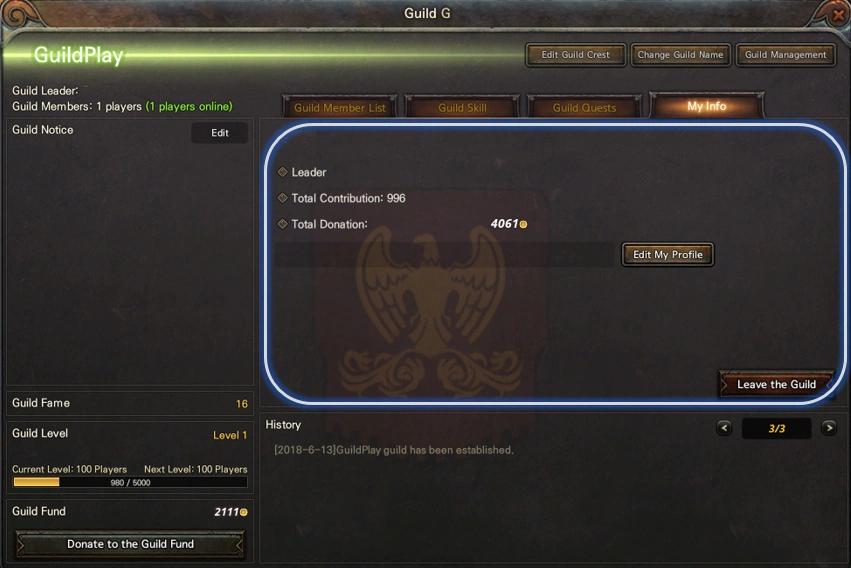
- You can see the information about your character.
- You can check your rank, cumulative contribution and cumulative total donations to the guild.
- You can also edit your profile and withdraw from the guild.
Edit Guild Crest[ | ]
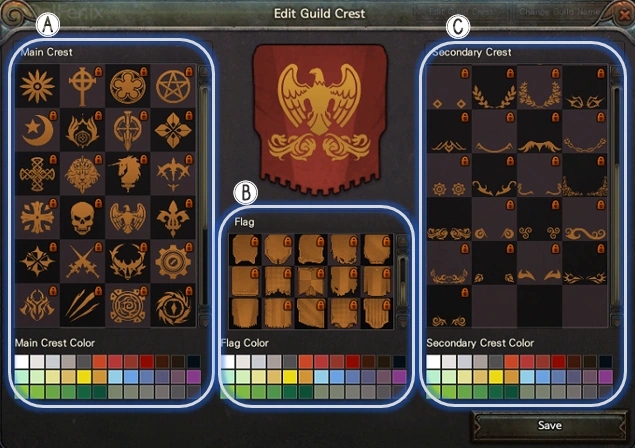
- Only the guild master can edit crest.
- You can select the pattern and color of the main crest.
- You can choose the shape and color of the flag.
- You can select the pattern and color of the secondary crest.
- Locked crests, flags and a secondary crest can be purchased by the guild master using Kuhn.
Change the Guild Name[ | ]
- Guild name change is only possible for guild master.
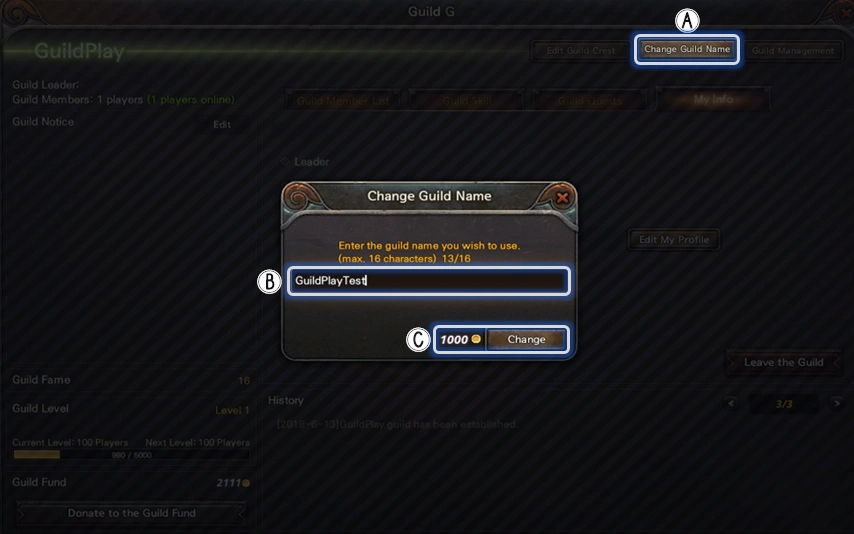
- Enter the guild name you wish to change (up to 16 characters).
- You can choose whether you want to change the name or not to change the name.
- You can make the final choice and pay for the change.
Guild Management (Detailed)[ | ]
- Guild management is only possible for guild masters.
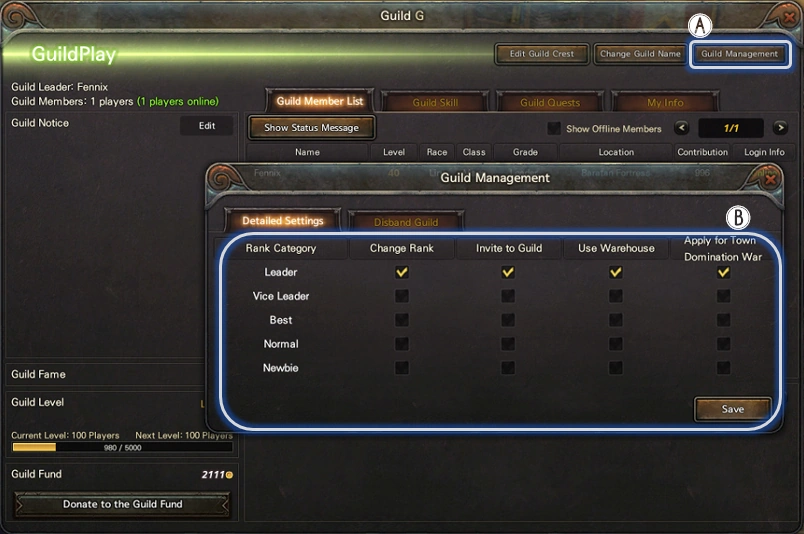
- You can click A to display a detailed settings window.
- According to each level of guild, the privileges within the guild will be applied through saving.
Guild Members Rank[ | ]
- Guild ranks can be set by clicking the name of the guild character of your choice from the guild member list.
- It is also possible to delegate and ban guild members.
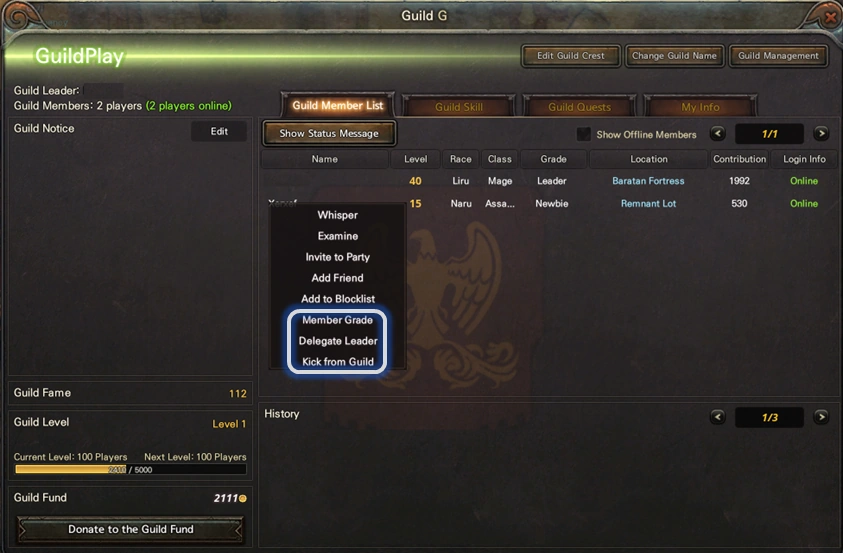
- Guild member ranks are divided into Vice Leader, best, normal and Newbie and can be assigned in the "Member Grade" option of the picture above.

Disbanding a Guild[ | ]
- Disbanding a guild is only possible as a guild master.
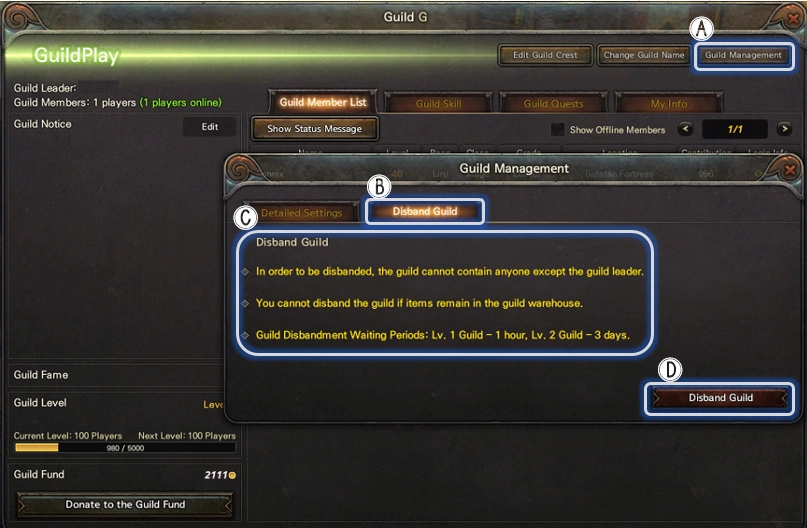
- You can click the A to display the guild management interface and then click B to display the dissbanding options.
- Disband options tab.
- You can check the conditions for disbanding guilds.
- If everything is ok with the conditions, click the "Disband Guild" button to proceed disbanding the guild.
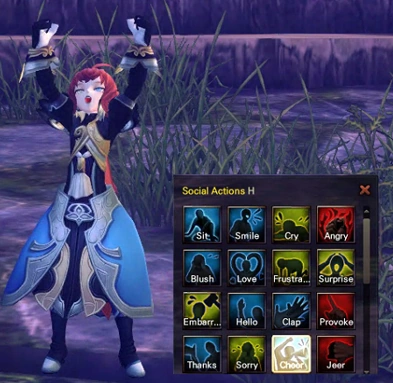
Social Actions[ | ]
- You can express your character's feelings through various social animations through shortcut key (H).
- These are also available through commands other than social action slot ( Ex: /Hello, /Angry, /Sit, /Cheer, etc)
Using the Box Option[ | ]
- Open your Inventory (Key "I" by default)
- Click on Box Option
- Check the box for "Use Auto-Box Opening
- You have to click on the rarity of the boxes (Magic, Rare, Unique and Legendary) that want to be opened.
Notes[ | ]
- You still need space in you inventory to use this feature.
- Boxes that are already in your inventory will not be opened this way since it only opens picked up new Boxes.
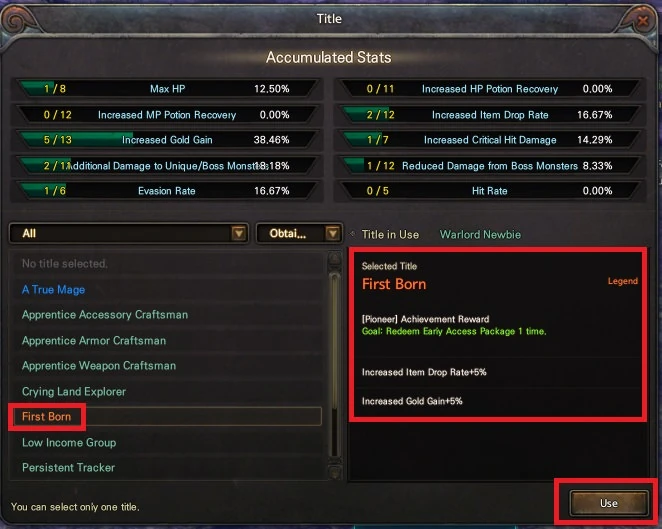
How to Redeem the title First Born[ | ]
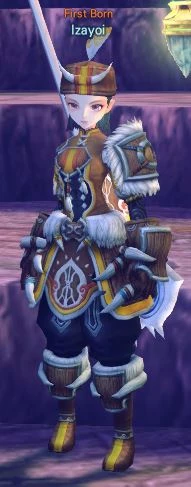
- REMEMBER THAT THIS IS CHARACTER BOUND!
Once you redeem it with one character, you will not be able to use it on other characters
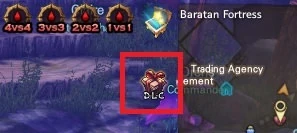
- Check that you have the Gift box icon next to the map and click on it.

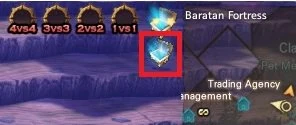
- You will now see an Open chest icon right below the Arena icons or the Attendance Event icon, click it.
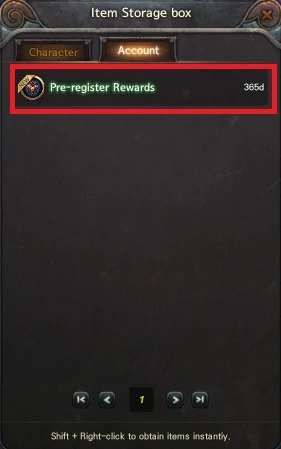
- This will open a Window called "Item Storage box". Click on the Account tab, there you should see Pre-register Reward, click on the item.
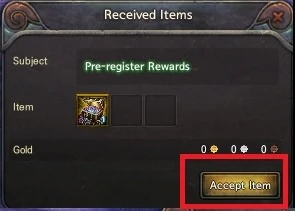
- Once clicked on the Pre-register Reward, you will see the Receive items window. Click on Accept item.
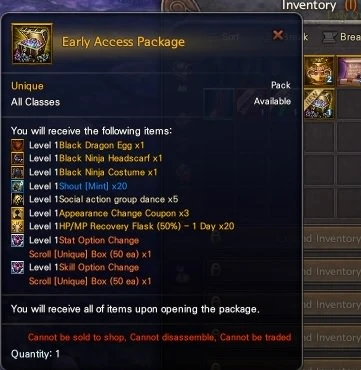
- This should reward you with the item Early Access Package. You will see it in your Inventory. Right-click on it.
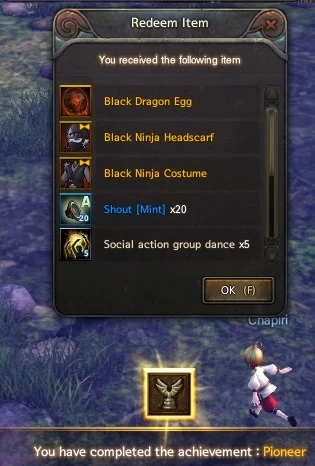
- After the previous step, you will see a Redeem Item window where you will see all the items that the Package rewards and that you were rewarded with an Achievement called Pioneer.
Check your Inventory to see all the items listed above.
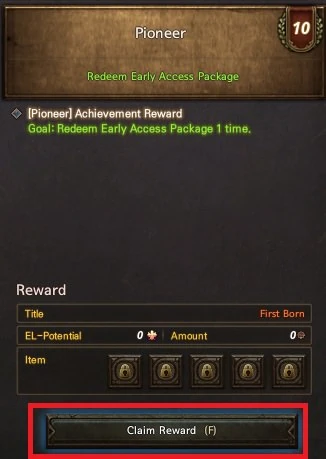
- To claim the Title First Born you have to open the Achievement window and click on the Pioneer Achievement.
- You will now see the Achievement and you can claim it by clicking on Claim Reward.
- After this, you should already have the title and the bonuses rewarded by the title.
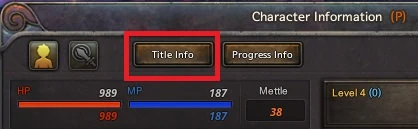
If you want to use your title and show the world that you are a First Born, you only need to go to you Character Information and then to Title Info to see all the Titles you have been and will be rewarded in your adventure.
- Click on the First Born title and then click on Use.